"I am very proud to be a demon. I want others to feel proud they're demons, too. Which is why...I want to improve the nature of students here and make this a house of learning that any demon would long to attend. That is my ambition."
-Ameri Azazel
(Welcome to demon school Iruma kun!)
══════⊹⊱❖⊰⊹══════
After less than a year, I finally came back from a seriously looong hiatus! No, that doesn't mean I'll be a full-time amino bloger now, but I might post once in a month or whenever I feel like it lol. But yeah, college is hitting hard af and I barely manage to do anyting beside studies. Fun fact, this is my first finished drawing in 2021 AND IT'S FREAKING MAY. How sad that is?
Anyway, I managed to catch up with second season of Welcome to demon school Iruma kun and so far I'm lovin' it. Ofc that pumped me up to draw our best redheaded girl Ameri Azazel! So without futher a do, let's get this started shall we?
◇

══════⊹⊱❖⊰⊹══════
Sketch
Ok so now this is the basic quick ass sketch ofc it looks weird and funny. Quick sketch is just a first phase of drawing or what I call "the base" of the drawing. It's like a skeleton to the drawing because you are positioning the whole drawing and what's important, you are avoiding the famous "I drew it too big or too small and it couldn't fit the paper" situation. This legit looks like a damn stickman with boobs and cat ears wtf...So basically, sketch follows many steps. And the first step is recognising the shapes that the figurine (Amari) has. Literally her body can be separated in several shapes just like this. Ik it looks ridiculous but it helps a lot if you ask me.
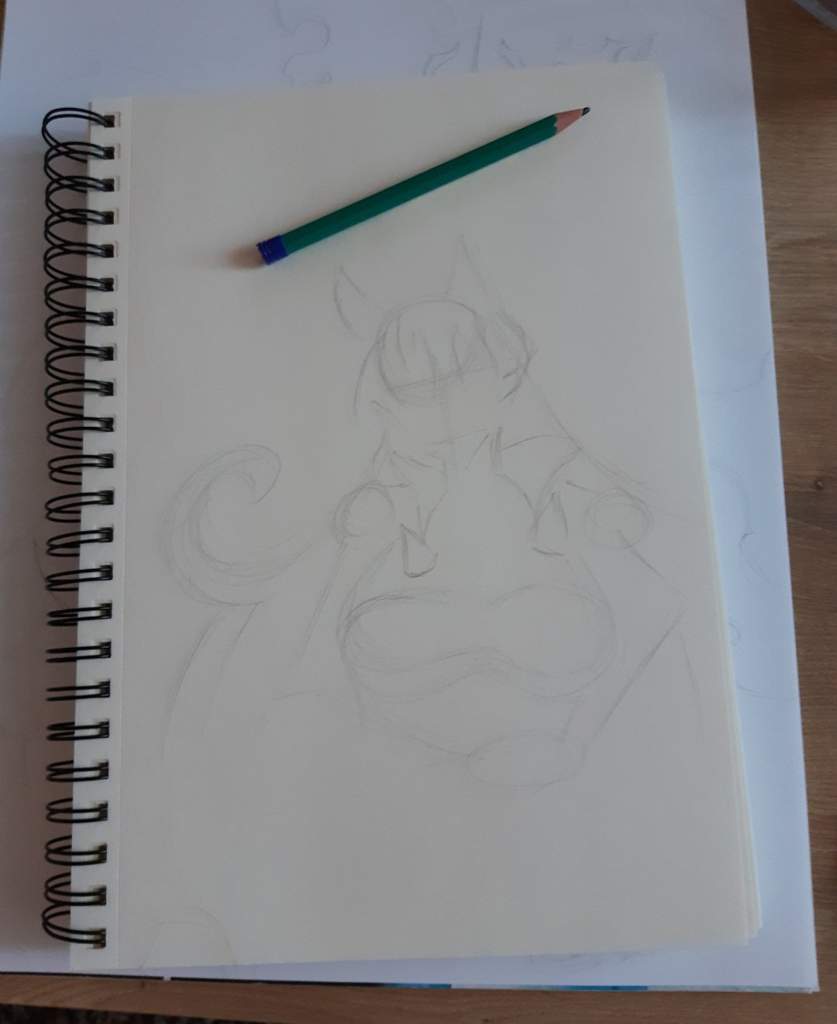
After the quick sketch, it's time to merge those lines and form the drawing base. Fixing shapes, connecting them and focusing on main lines. That's the big deal. Next step: And after that, your figure needs to take some specific shape. I always start from the top aka head but ofc I leave the face for the end. I definitely focused on her body line first because it had soooo many curves and anatomy fuckeries in regular. You have no damn clue how sceptical I was during this sketch process. Everything looked kinda weird. Her pose was from a specific angle that I barely figured out.
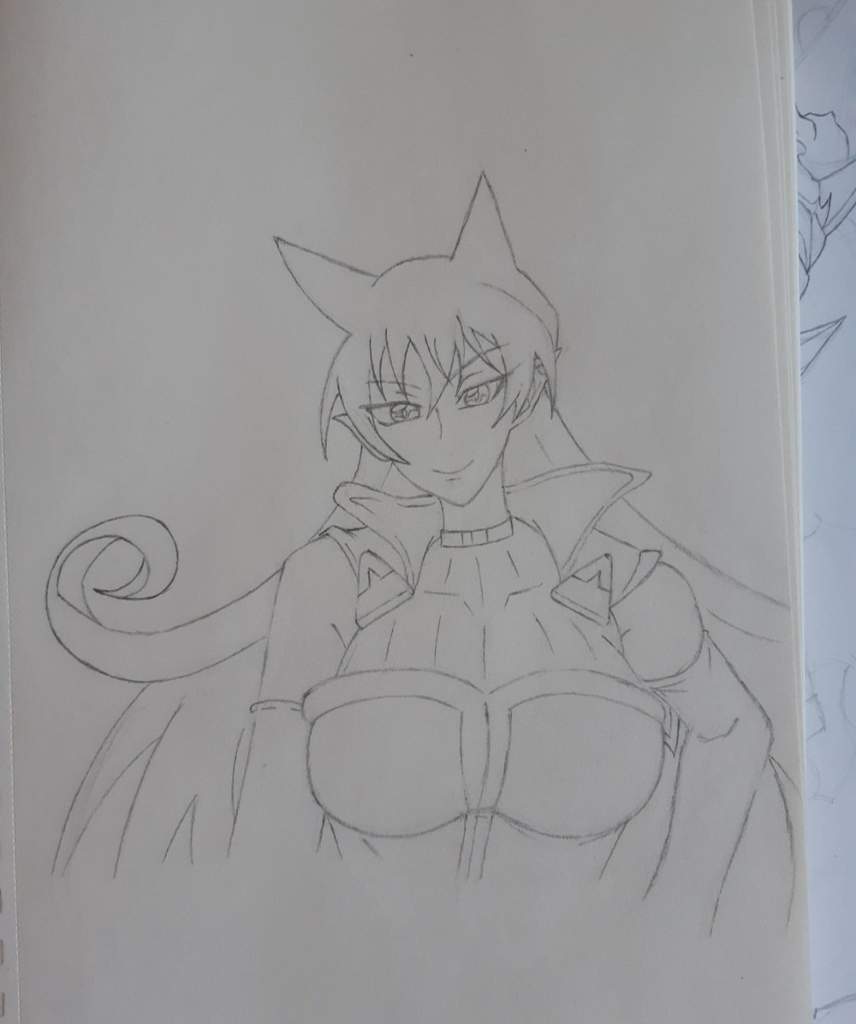
Quite satisfying ngl. Just look at those liiiiines. Please do look because I wasted too much time on those lmao, have some sympathy for me I've become rusty over these few months of break.
══════⊹⊱❖⊰⊹══════
Coloring
And the moment we've all been waiting for. The coloring process baby! Tbh it was my intention from the bare start and moment when I saw her for the first time. I didn't want to go full ink magician mode so I just let the markers do their job. And coincidence forced me to do it in markers since I just happened to have perfect matches of colors.
So, for Ameri, I used touchfive markers number: 22, 23,14, 37,32, 38, 21, 9, 27, 25, 36, 38, 98, CG0,5-3-5-7-9; GG1-3-9; WG0,5-1; and BG3. If I missed one, here's the whole pallete of each I used and for what:
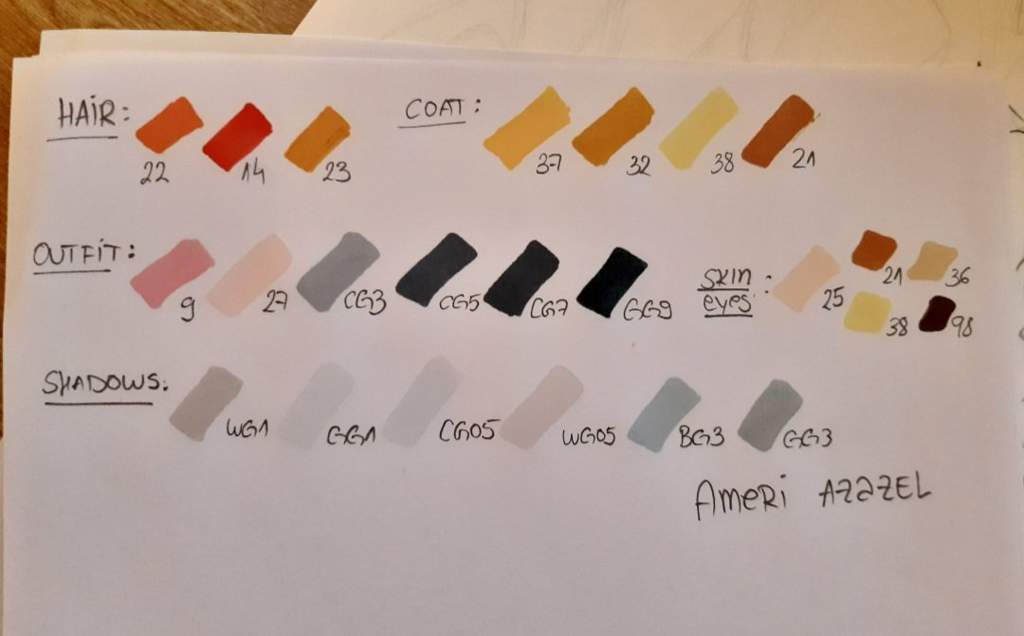
Few of you actually asked me how do I decide which marker colour should I use. Tbh I don't even know myself. It's just something you call "sense". I was thought how to recognize over 10 colours on a object where someone would just say "it's red-that's all". First start with colours that are related to the main one, then always look for white and gray moments because those colours are everywhere. Even black. And ofc test your markers before applying it directly to the drawing so that you can easily compare it to the reference pictures.
══════⊹⊱❖⊰⊹══════
Now, touchfive markers work in layers. The first layer always needs to be the lightest colour you prepared. Also you need to be quick because touchfive markers are alcohol based markers and they dry quickly- when you get over with same marker over the dried part you'll see some darker parts that are not so nice to look at.
Hair
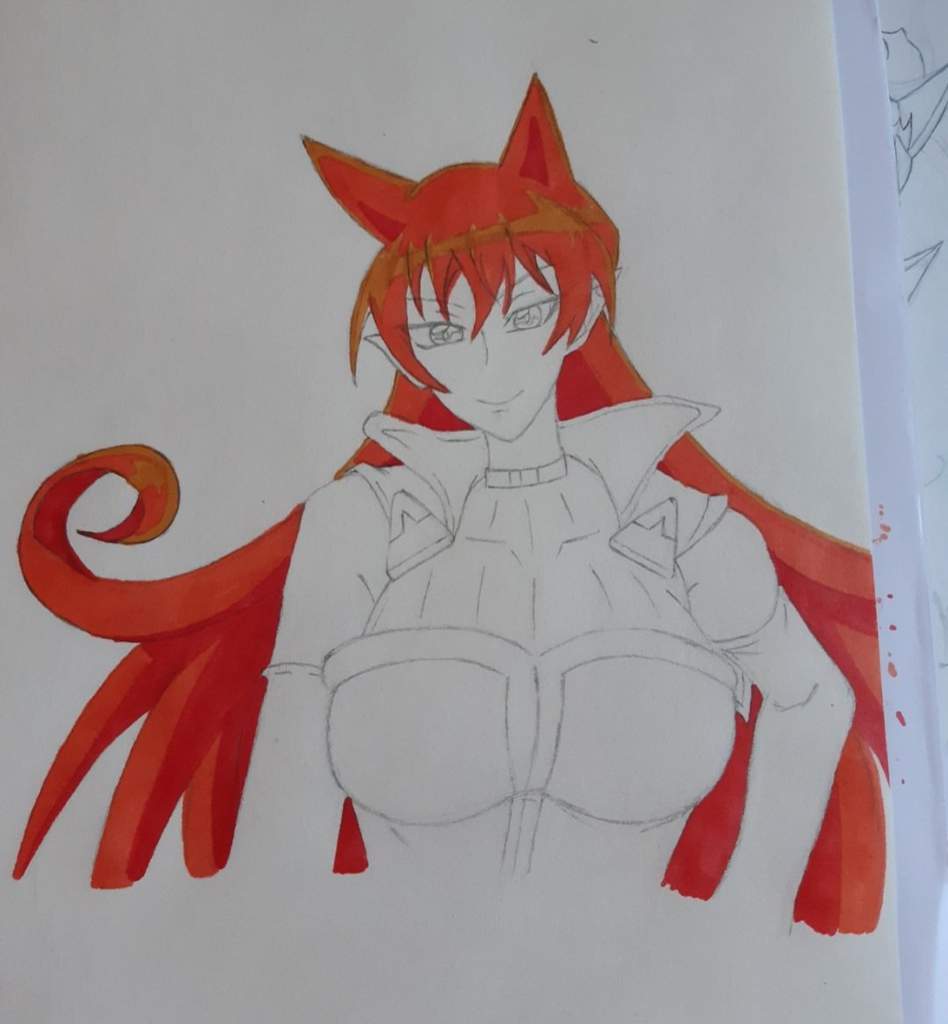
Now, you can already guess how I did it: 23+37 for the lightest part of her hair, those yellow-ish outlinings and so called "shine" over her forhead. Since the shining was a bit too dark, I used a small hack on how to light it up a bit: grab a white jelly pen, go over it (don't worry, it won't cover it fully because of the markers) and after that I covered it with 38 and it turned out pretty good ngl. After that, 22 was used for main hair colour, ligher parts. Crimson 14 was used for shadows, and to make some parts even more darker used somewhere WG05 and somewhere WG1. Why WG? Red and orange are warm colors, that's why I used "warm gray". Easy lmao. Oh yeah, about those leakings that went trough lines, no worries, they will be covered with ink liners when I'm done with coloring. Sneaky, am I h3h?
Cloting
Ok, dont assault me but the lower part of her dress (gray one) will be called corset. Ngl corset was quite a pain in the ass, but a fun pain in the ass. Various shades of gray where used but I mostly used CG3-5-7 and GG9. Now this required a lot of BLENDING which means I stared from the bottom. The darkest CG7 and when I filled some part of it, I purposely left few tiny lines that were meant for blending with CG5. After that I covered those lines AND WHOLE CG7 SECTION with CG5, added some area filled with CG5 and same with CG7, left few lines for CG3. And after that CG3 covered both CG5 and CG7 areas and it blended AND left an interesring texture since I used a wrong paper that wasn't quite made for markers lol. Yes, the paper did get wrinkly while it was wet but when it dried out, wrinkles dissapeared. The pink part was simply covered with 27 (salmon pink hehe) and the closest color I had was 9 and I used it for shadows, both on sleeves and chest part.
And last but not least, her coat or whatever that sbort yellow thing is on her back lmao. I made it a bit more yellow than it is in original designe because I didn't want for it to blend with hair and I lacked with orange shades lmao. So, I just mixed 32, 37, 38 and 21 and a bit of WG1 where it needed to be dark. Oh yeah, buttons where a mix of CG5, 38 and WG05.
Skin and eyes
I swear, for the first time in my life, I actually dared to use white skin colored marker such as 25. Others that I have are either too pink or too mustard like. Usually I use a skin colored pen for it and then photoshop the whole thing but this time I went straightforward and used marker. In the first it was dark but when the filled area went dry, her skin looked nice and I was glad!!!! Oh yeah, I used WG05 for shadows too.
And for eyes I used 38 for the glowing/reflecting parts, 36, then 21 and 98 as gradient. Also the iris is black 180. And as for the lashes, I used stabilo orange thin marker cause I thought it would look cool to use ultra thin markers idk don't judge.
══════⊹⊱❖⊰⊹══════
Inking + background
Now that everything looks just fine and all we're left to do is to line up everything and give our best girl a proper shape and attitude UwU. I didn't bother to use a bunch of liners as I do, so I was satisfied with 0.3 and 0.1. Some of them were double-lined or triple lined based on the segment of his body and hair. Ngl I was really happy when I finished with inking because it finally took a shape and looked good.

As for the background, I just wanted to make it not so boring so I played around with WG05 and WG1 and make it look like she has a shadow idk.
══════⊹⊱❖⊰⊹══════
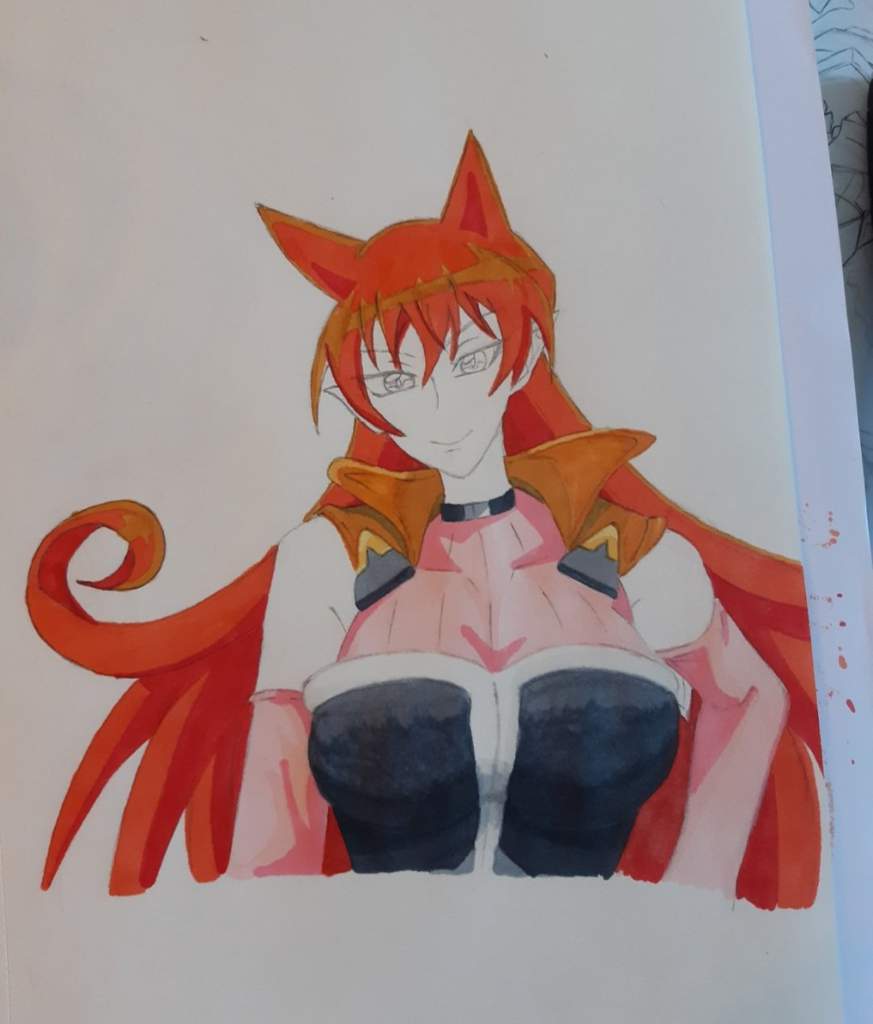
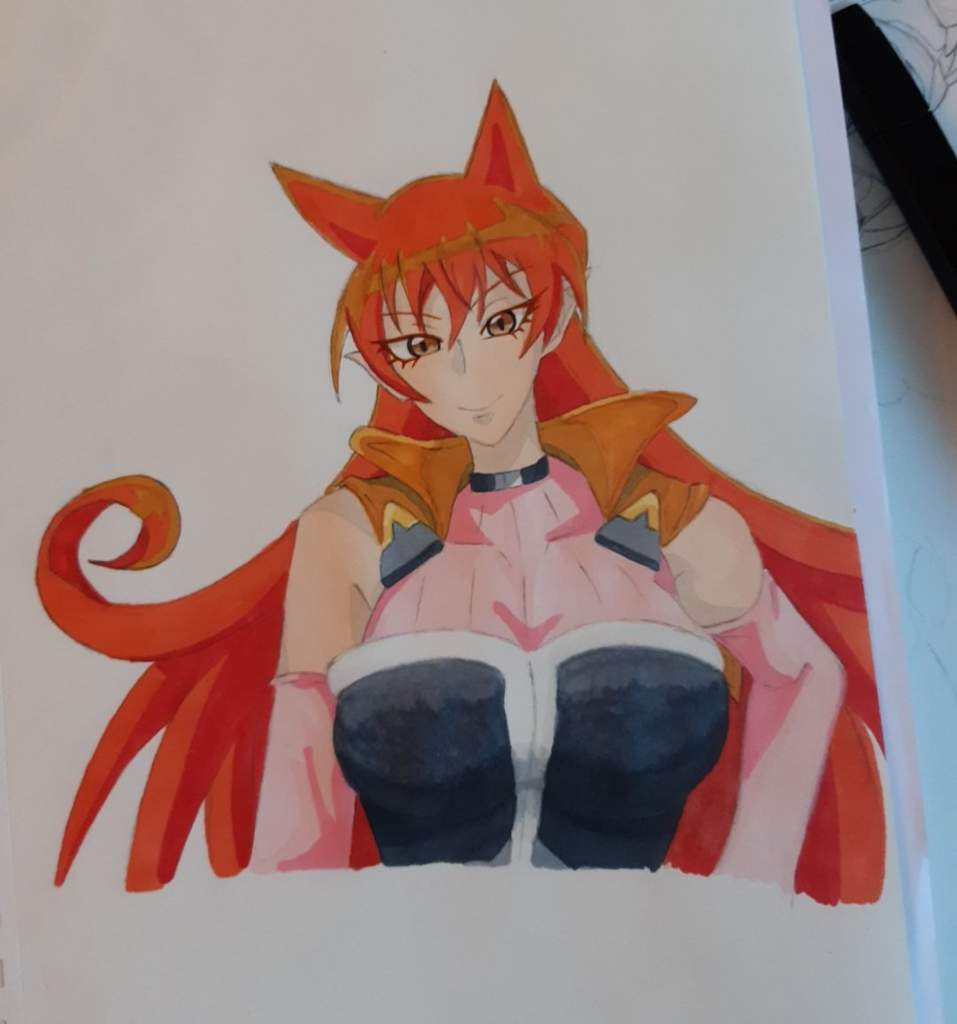
Finished product
I had to wait for daytime to get better lightning atmosphere and show the maximum of colors. And just to spice it up, fix some shadows from decorative markers I put for the aesthetics and make it more enjoyable, I messed around with photoshop aka Google's snapseed. It's pretty neat free photo editing app so I recommend it!

After fixing saturatisation, lights, contrast, sharpness and all the things that my camera lacks with, I finally achieved perfection of Ameri Azazel!
══════⊹⊱❖⊰⊹══════
That would be all from me for now. I hope you enjoyed my drawing process and whole detailed description lol. Now, go watch Iruma kun and I'll see you whenever lmao. See ya and take care!
No comments:
Post a Comment